
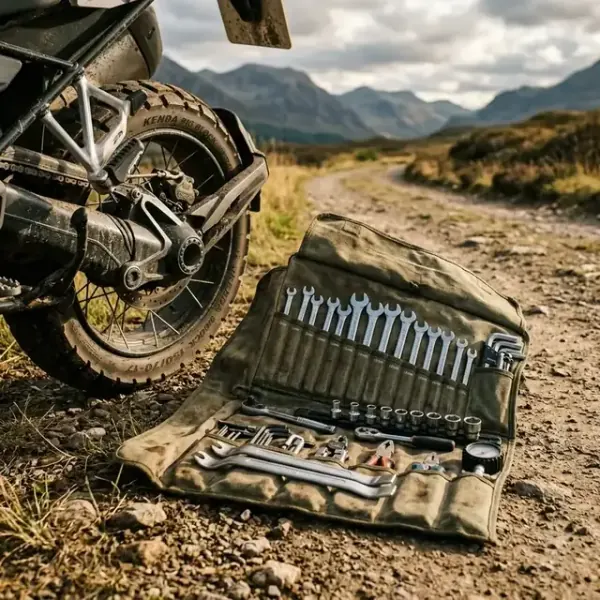
A motorcycle that breaks 400 kilometers from the nearest paved road is not the same problem as a motorcycle that breaks in town. The difference is recovery time, daylight remaining, water on board, and how many people know the rider’s planned route. A properly curated tool kit does not fix every possible failure — it covers the failures statistically most likely to happen and turns them into delays measured in minutes, not days.
This guide is a complete essential motorcycle tool kit for long-distance overlanding, organized by function and weight-tagged so the kit can be assembled to a target mass before the trip. The goal is the minimum viable set that handles real trailside breakdowns: punctures, snapped chains, stripped bolts, fractured plastic, and the small electrical gremlins that strand a bike in the middle of nowhere.
Introduction: The Worst-Case Trailside Scenarios
The failures that end overland trips fall into a short, predictable list. Punctured tires top it — sharp gravel, slate fragments, and the occasional rusted nail account for roughly half of all field repairs. Snapped or seized drive chains come next, especially on bikes carrying 30+ kilograms of luggage on washboard surfaces. Broken levers and shifters follow, almost always the result of low-side drops on loose terrain. Loose or sheared bodywork bolts vibrate themselves apart on long corrugated sections. Dead batteries, cooked fuses, and chafed wiring round out the list.
What unites these failures is that none of them require a workshop. Every one of them is repairable at the side of the trail with hand tools that fit inside a 30 × 15 × 10 cm tool roll. The catch is that the right tools have to be in the roll before the bike leaves home — none of them can be improvised from a stick and a rock.
The golden rule of an overlanding tool kit is this: the kit is not designed to fully restore the motorcycle. It is designed to restore enough function to ride the bike to the nearest village, town, or workshop where a proper repair can be done. A field repair that holds for 60 kilometers of careful riding is a success. A field repair that produces a fully concours-correct fix is wasted time, weight, and tool inventory.
That distinction matters because it dictates everything that follows. Sockets are sized to fit the bike’s most critical fasteners, not every fastener. Spare parts cover the components statistically most likely to fail, not the entire bill of materials. Consumables are chosen for adhesive strength and weight, not for shop-grade longevity. Everything in the kit earns its place by answering one question: does this turn a stranded bike into a moving bike?
Standard Tools: The Bare Essentials
The foundation of an adv motorcycle tool list is socket coverage matched to the specific motorcycle. Japanese bikes (Honda, Yamaha, Suzuki, Kawasaki) use predominantly 8, 10, 12, 14, and 17 mm fasteners for accessible service points. European bikes (BMW, KTM, Husqvarna, Ducati) mix the same metric sockets with Torx fasteners — T25, T30, T40, and T45 are common on bodywork, brackets, and electronics. A few Italian and German models use hex/Allen heads on critical components, which means a folding hex set is non-optional on those machines.
Pre-trip inspection identifies the actual fasteners on the bike. Every accessible bolt that might need attention in the field — axle pinch bolts, brake caliper mounts, sprocket bolts, oil drain, exhaust hangers, foot peg mounts, lever pivots — gets noted along with its socket size. The tool roll then carries those sizes and no others. Carrying a complete 6-19 mm socket set is roughly 1.2 kg of metal that mostly never gets used.
The T-handle wrench is the workhorse of trailside tool sets. The fixed perpendicular handle gives leverage without slipping, the speed-spin shaft breaks bolts loose faster than a ratchet, and the rigid construction does not flex under load the way a folding tool does. A single T-handle with interchangeable 8, 10, 12, and 14 mm sockets weighs about 350 grams and handles 80% of the bike’s accessible fasteners.
Multi-tool selection follows a clear rule: prioritize pliers and wire cutters over knife blades and corkscrews. Field repairs that need a multi-tool are usually electrical (snipping a chafed wire, crimping a connector) or mechanical (gripping a stripped bolt head, twisting safety wire). A Leatherman Wave+ or Gerber MP600 covers those use cases in a 250 g package. Cheap multi-tools with floppy joints will round off bolt heads and bend on the first real job — false economy.
A compact adjustable wrench fills the gap when a fastener falls outside the socket selection. The 6-inch (150 mm) size weighs about 200 grams and adjusts from roughly 0 to 18 mm. It is the tool that handles brake caliper bleed nipples, oddly sized footpeg bolts, and the rare imperial fastener on aftermarket accessories. A wrench is slower than a socket but never the wrong size.
Pannier Tool Roll Checklist
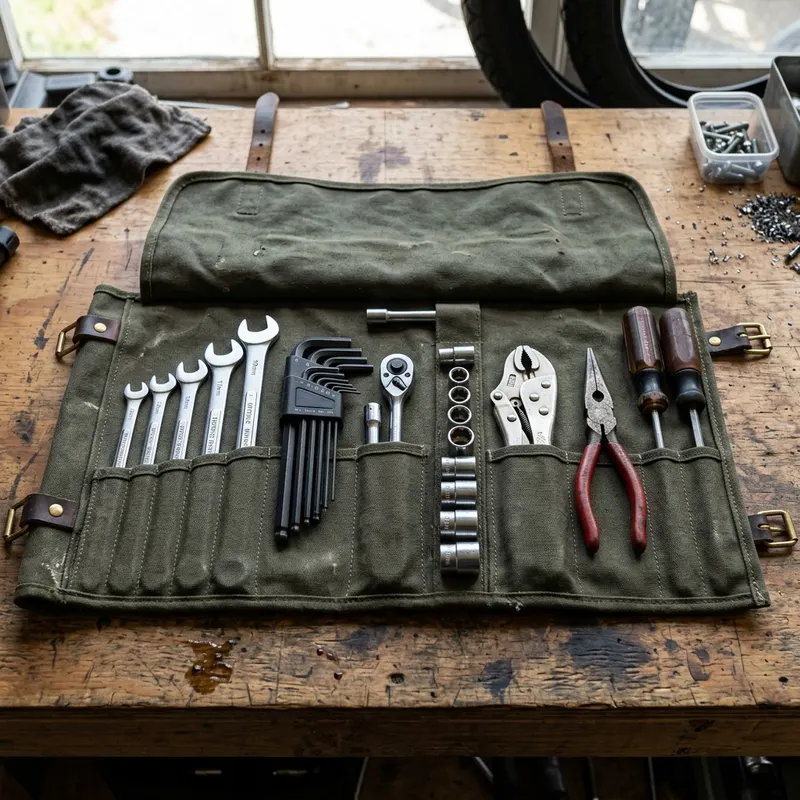
The pannier tool roll holds the core hand tools. A canvas or Cordura roll with individual pockets keeps the tools quiet (no metal-on-metal rattling), prevents loss, and lets the rider see at a glance if anything is missing after a repair. The total weight target for this roll is roughly 1.2 to 1.4 kg.
- T-handle wrench with 8, 10, 12, 14mm sockets (350 g)
- Folding hex/allen key set metric 2-10mm (150 g)
- Folding Torx key set for BMW/KTM T10-T40 (150 g)
- Multi-tool with pliers and wire cutter (250 g)
- Compact adjustable wrench 6-inch (200 g)
- 2x Lightweight tire spoons with axle nut ring (300 g)
The tire spoons deserve a note. The axle nut ring at the end of each spoon serves double duty as a wrench for the rear axle nut — usually 22, 24, or 27 mm depending on the bike. This eliminates the need to carry a large dedicated socket for the axle, which would otherwise add 200 grams of single-purpose tooling.
Tire Repair & Recovery Kit
Tire repair is the highest-frequency field repair on any overlanding trip. The kit varies depending on whether the bike runs tubeless or tubed tires, and the difference is significant enough to dictate riding style on technical sections.
Tubeless tires accept plug repairs without removing the wheel. A T-handle insertion tool drives a sticky rubber plug into the puncture from the outside of the tire. Total repair time from stopping the bike to riding away is typically five minutes. The plug holds at full road pressure indefinitely on most punctures — riders routinely complete multi-thousand-kilometer trips on plugged tires. The trade-off is that the bike must run tubeless-compatible rims, which excludes most spoked wheels on traditional adventure bikes.
Tubed tires require a full wheel removal and tire-off-the-rim procedure to access the tube. The repair adds 30 to 45 minutes minimum, requires real upper-body effort to break the bead and lever the tire off, and demands a clean working surface to avoid contaminating the patch or new tube. The advantage is that spoked rims (which most serious off-road wheels are) handle hard impacts better than cast tubeless rims — they bend instead of cracking.
Compressor selection separates serviceable kits from kits that will leave the rider walking. A 12 V electric compressor powered from the bike’s accessory socket or battery terminals can inflate a fully deflated motorcycle tire to 2.0 bar (29 psi) in 3 to 5 minutes. Hand pumps are theoretically possible but realistically require 15 to 20 minutes of hard pumping per tire — not a practical solution after a long ride day.
The compressor needs three properties: a real pressure gauge (not a printed sticker), a clip-on chuck that locks to the valve stem without leaking, and enough cable length to reach the rear tire from a 12 V outlet near the bars. Cheap compressors from generic online sellers fail on all three counts.
A pencil-style tire pressure gauge serves as a backup to the compressor’s built-in gauge. The compressor gauge usually reads 5-10% high, which matters when adjusting pressures for off-road sections where the target is precise (1.0 bar in deep sand, 1.4 bar on slate, 2.0+ bar on highway). A separate accurate gauge confirms the actual pressure.
Spare valve stems and a valve core remover round out the kit. Sheared valve stems happen on hard impacts and at high speeds when a wheel weight contacts the stem. The valve core remover doubles as the tool for fully deflating a tire before reseating after a plug repair — handy when the bead has lifted off the rim during the puncture.
Emergency Tubeless Tire Pack
This sub-kit lives in a dedicated zippered pouch alongside the main tool roll. Keeping it self-contained means the rider grabs one pouch in a puncture emergency rather than digging through the full tool roll. Total weight is around 770 grams.
- Compact 12V electric air compressor with built-in gauge (550 g)
- Tubeless tire puncture repair kit plugs and tools (150 g)
- Pencil tire pressure gauge (50 g)
- Spare valve stems and valve core remover (20 g)
For tubed-tire bikes, the substitutions are: replace the plug kit with two spare inner tubes (one front-size, one rear-size, roughly 600 g combined), and add tire bead lubricant in a small bottle to make remounting easier. The compressor stays the same.
The Bush Mechanic Consumables
Consumables are the small expendable items that bridge the gap between tools and spare parts. They are individually cheap, collectively essential, and the part of the kit most often skipped by riders new to long-distance overlanding.
Zip ties are the duct tape of mechanical repair. Heavy-duty 4.8 mm (3/16 inch) ties in 200 mm and 300 mm lengths secure broken bodywork, lash a cracked pannier mount, hold a flapping fender against the swingarm, and immobilize a snapped clutch cable enough to ride one-handed to the next town. Twenty assorted ties weigh 80 grams. The cost is negligible. The value is enormous.
Gorilla-grade duct tape covers what zip ties cannot. A leaking fork seal, a torn seat cover, a split fuel line above the petcock, a smashed headlight lens — all repairable enough to keep moving with the right tape. The standard recommendation is to wrap a meter or two of tape around a pencil or short dowel rather than carrying a full roll. The wrapped tape weighs 100 grams and uses no luggage volume.
Steel epoxy in a syringe (JB Weld or equivalent) handles the failures that adhesive tape cannot. A cracked engine case, a stripped thread, a broken footpeg bracket — quick-curing steel epoxy sets in 5 minutes and reaches full strength in 24 hours. Permanent repairs done with field-applied steel epoxy have completed full trans-continent trips before reaching a workshop. The syringe weighs 60 grams and lasts multiple seasons before drying out.
Threadlocker — specifically medium-strength blue Loctite 242 — prevents the slow-loosening of vibration-sensitive fasteners. Fork pinch bolts, sprocket bolts, exhaust hanger bolts, and aftermarket luggage racks all benefit from a single drop on the threads. The 20-gram bottle treats hundreds of fasteners over its lifespan. Avoid red high-strength threadlocker (272) in a field kit — it requires heat to remove, which is not available trailside.
A spare master link sized to the bike’s chain is the single highest-leverage spare part in the kit. Drive chains snap rarely but catastrophically — usually when a stone wedges between the chain and a sprocket and pulls the chain sideways off the teeth. A snapped chain leaves the bike completely immobile. A master link plus a chain breaker tool (or a stout hammer and punch) repairs the chain in 15 to 20 minutes. The link itself weighs 30 grams.
Bailing wire — heavy-duty steel safety wire — handles repairs that nothing else can. A snapped clutch cable can be temporarily spliced with wire. A broken pannier mount can be lashed to the subframe. A loose exhaust can-mount can be wired to a rear footpeg bracket. The wire is the field repair equivalent of welding without the welder. A small spool of 1 mm safety wire weighs 50 grams and provides several meters of usable repair material.
Trailside Consumables Checklist
This is the small-parts bag — typically a 15 × 10 cm zippered pouch tucked into the bottom of a side pannier. Total weight is around 340 grams.
- Assorted heavy-duty zip ties various sizes (80 g)
- Small roll of gorilla duct tape wrapped on a dowel (100 g)
- Quick-curing steel epoxy JB Weld syringe (60 g)
- Medium-strength threadlocker Blue Loctite 242 (20 g)
- Spare chain master link matched to chain size (30 g)
- Heavy-duty safety bailing wire 1mm (50 g)
A few additional consumables earn space depending on the trip’s specifics. A small tube of dielectric grease (15 g) prevents electrical connector corrosion on long wet trips. A handful of spare fuses matched to the bike’s fuse panel (5 g) cover blown circuits. A spare clutch lever and brake lever, while not strictly consumables, prevent a single drop from ending a remote trip — they live in a separate spares bag, not this consumables pouch.
Conclusion: Test Every Tool Before the Trip
The single most common failure mode of an overlanding tool kit is not a missing tool — it is a tool the rider has never used before. The first time someone breaks a master link with their tool kit should not be 80 kilometers from the nearest road. The first time the compressor gets connected to the bike’s battery should not be at sunset with a flat tire and a thunderstorm rolling in.
Before any long trip, every tool in the kit gets a dry run at home. Punch a chain link out and reinstall it with a master link. Remove and reinstall a wheel using only the tire spoons and the axle nut wrench in the roll. Fire up the compressor and inflate a tire from 0 to 2.0 bar. Break a bolt loose with the T-handle. Apply zip ties to a mock-broken bracket. Each exercise takes a few minutes and reveals exactly which items in the kit are missing, undersized, or incompatible with the bike’s actual fasteners.
A kit that has been used at home becomes muscle memory in the field. A kit that has only been packed becomes a 3 kilogram pile of unfamiliar objects on the wrong day. The difference is the practice runs.
A final note on storage: the tool roll and the spares bag belong at the bottom of a side pannier, low and centered on the bike. The combined weight of a complete kit — roll, compressor, consumables, and spares — is typically 2.5 to 3.5 kg. That weight low on the chassis is invisible in normal riding. That same weight strapped to a tail rack or top box pulls the bike’s center of gravity skyward and makes every corner, crosswind, and slow-speed maneuver harder. Where the kit lives matters almost as much as what is in it.
A well-built what tools to pack long distance ride answer is a personal kit, refined over multiple trips, weighing under 4 kg total, and matched to one specific motorcycle. The lists in this guide are the starting point. The right kit is the one assembled, tested, and trimmed before the bike leaves the garage.
Recommended Kits and Tools
Pre-assembled tool kits and quality individual components save the trial-and-error process of building a kit from scratch. The following are the most commonly recommended starting points for adventure motorcycle tool kits.
CruzTOOLS RoadTech M3 Kit — Check Price on Amazon →
Stop & Go Tubeless Repair Kit — Check Price on Amazon →
Motion Pro Chain Tool — Check Price on Amazon →
Disclosure: Some of the links in this article are affiliate links. If you buy gear through them, we may earn a small commission at no extra cost to you. It helps fund the road trips that make these independent guides possible — every tool recommendation here has been carried on a real overlanding trip before it made the list.
Frequently Asked Questions
How heavy should an overlanding motorcycle tool kit be?
A well-curated kit for a mid-weight adventure bike lands between 2.5 kg and 3.5 kg total, including the tool roll, tubeless repair kit, compressor, and consumables. Anything above 4 kg usually means duplicated functions or oversized sockets the bike does not actually need. Anything under 2 kg typically skips the spares (master link, threadlocker, bailing wire) that turn a real roadside repair from a 20-minute job into a four-hour disaster.
Should an off-road tool kit include a torque wrench?
Not for trailside use. A compact torque wrench adds 800 g to 1 kg and only reaches a handful of fasteners that genuinely require calibrated torque (axle pinch bolts, head bolts, oil drain plugs on aluminum threads). Hand-tight plus a known reference feel covers most field repairs. Torque-critical fasteners are checked at home before the trip and re-torqued at the next paved-road stop, not on a remote climb.
Tubeless or tubed tires for adventure riding — which is easier to repair on the trail?
Tubeless tires are significantly easier to repair in the field. A puncture in a tubeless tire takes five minutes with a plug kit and a 12V compressor — the rider does not remove the wheel. A tubed tire requires breaking the bead, prying the tire off the rim, patching or swapping the tube, refitting the tire, and re-inflating. Forty minutes minimum, plus the strength to lever a stiff dual-sport tire by the roadside. Both systems work; tubeless is the lower-stress choice for solo overlanding.
What is a master link and why does every motorcycle tool kit need one?
The master link is the single removable link that joins a motorcycle chain into a continuous loop. It is the weakest point in the chain and the first part to fail when a stone gets caught between the chain and a sprocket. A spare master link sized to the bike's chain (520, 525, or 530 typically) weighs 30 grams and turns a snapped-chain catastrophe into a 15-minute repair. Without one, the bike is unrideable until the chain is replaced or welded — which is not possible in the bush.
Does a multi-tool replace the need for a dedicated tool roll?
No. A quality multi-tool covers pliers, wire cutter, screwdrivers, and a knife — useful for general fixes, electrical work, and zip-tie repairs. It does not replace a proper T-handle for socket work or a chain breaker for serious chain repairs. The two complement each other: the multi-tool handles fast fixes without unpacking the main tool roll, while the dedicated roll handles the deeper jobs that need leverage and specialized profiles.